

How to install, set up and use RetroPie
For this build, we’re going to use Retropie and a preconfigured image.
RetroPie is a software library used to emulate retro video games on the Raspberry Pi computer. It’s one of the most popular Raspberry projects and one of the most popular emulation systems for the Raspberry Pi. It is one of the most supported by the super community members. There are alternatives on single board computers, and even modifying some of the Mini systems like Hakchi with the NES/SNES Classics, and Autobleem for the Playstation Classic. Look out for tutorials/reviews on those in the future too!
RetroPie runs Emulation Station and supports all major retro video game emulators, allowing you to play games from the NES, SNES, Sega Master System, Sega Genesis, Nintendo 64, MAME, and more on your Raspberry Pi.
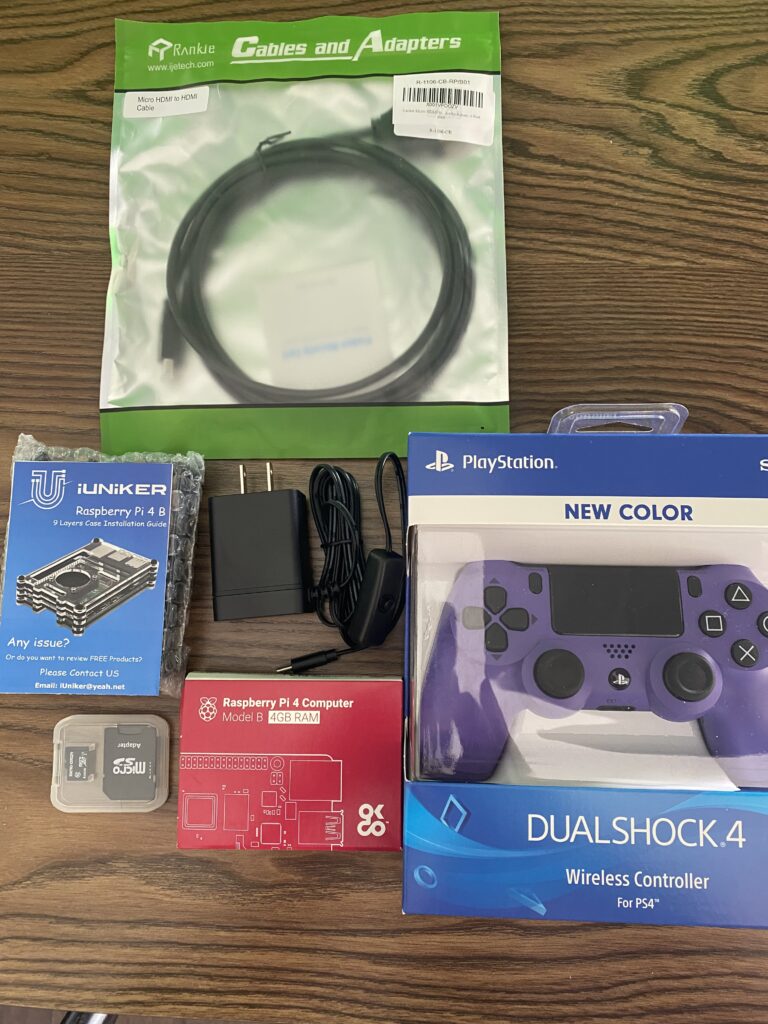
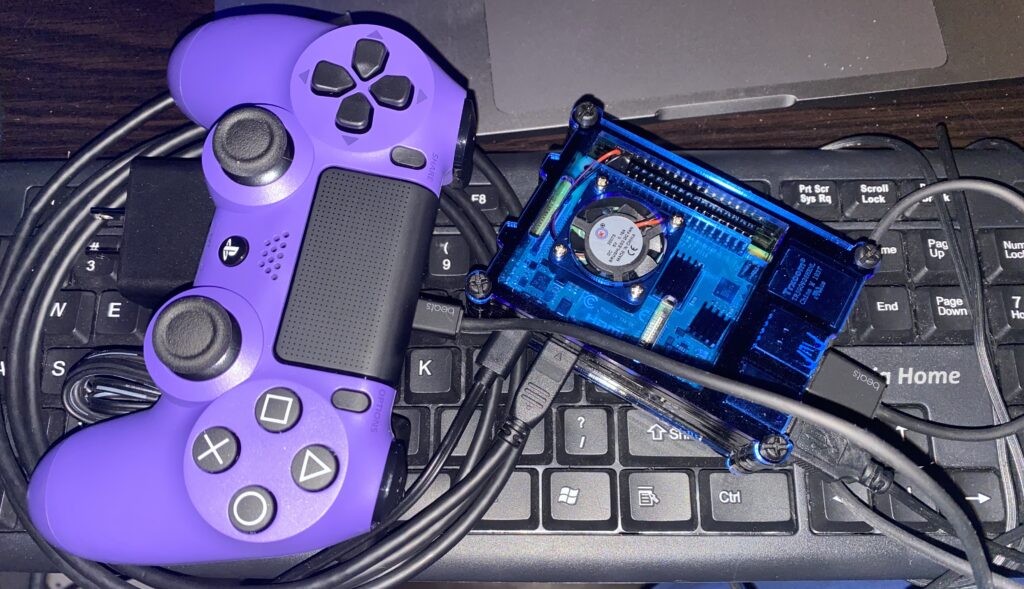
Any Raspberry Pi model can run RetroPie, but I recommend using the Raspberry Pi 4 and this build will be on a Raspberry Pi 4 w/4gb Ram, since its more powerful GPU, CPU, and RAM capabilities will maximize the range of games we can play.
Prep your Raspberry Pi
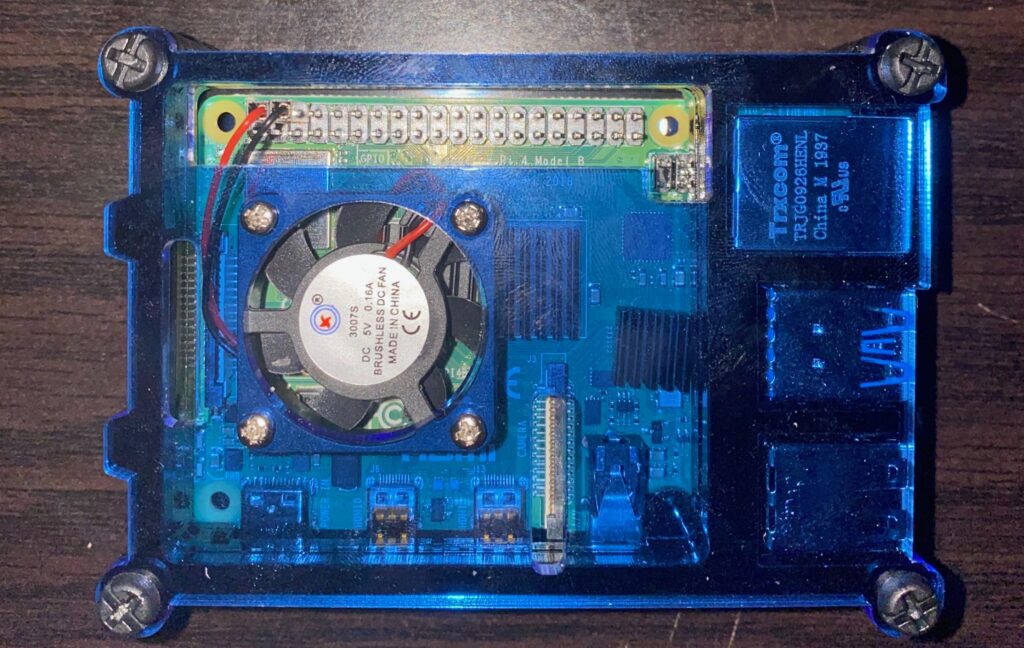
The Raspberry Pi ships without a case. I recommend purchasing a nice CanaKit if your budget allows if not you can pick up some solid cases that provide better cooling and protection or even better aesthetics. For example on my Rapsberry pi3B+ I have a Super Famicom case complete with functioning off/on switch from RetroFlag!
Download a RetroPie SD-Card Image

RetroPie is a software package for the Raspberry Pi that is based on the Raspbian OS, a Linux distribution. It combines a full suite of tools and utilities that will allow you to quickly and easily run retro game ROMs for various vintage gaming emulators.
We’re going to perform our RetroPie set up using an SD card image — essentially a snapshot of an entire working installation of RetroPie rather than doing a manual RetroPie install.
Because the Raspberry Pi doesn’t have an internal hard drive, it uses a microSD card for storage of the entire operating system and all files contained therein.
To set up RetroPie, Download and unzip your preferred Image. You can watch various reviews of different images available on ArcadePunks (Great site with an awesome community) at Youtube. For this build we are using the Wolfanoz Supreme Pro 256gb Raspberry PI 4 image and a MicroCenter 256gb MicroSD Card.
Images at Arcadepunks are able to be downloaded via Torrent or NZB. In some cases there are other ways to download. The recommended is to have a usenet account. You can find lots of recommended UseNet services. We will update this tutorial with recommendations in the near future as we are testing a few to find our favorite!
Format your MicroSD card to prep for the image
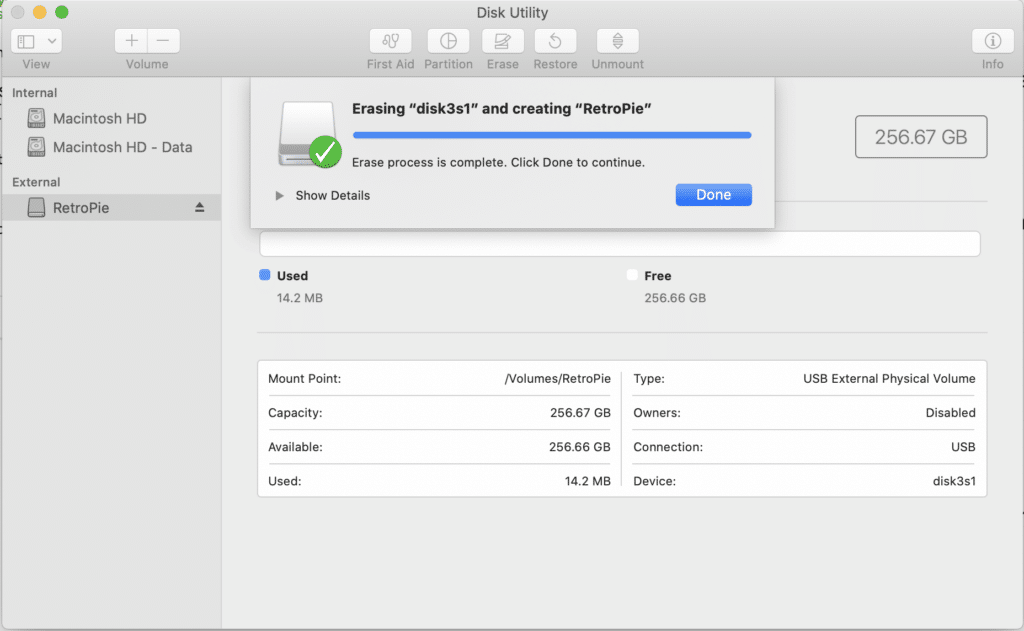
First, you’ll need to format the SD card as ExFat. Insert the SD card into your SD card reader. Your SD card will now show up as a mounted drive on your computer.
We will format the microsd card as ExFat.
Formatting on Windows
Open up Explorer, locate the SD card, right-click it, and select Format from the context menu. Select the desired format and click the Start button.
Formatting on Mac
Open Disk Utility by navigating to Applications > Utilities > Disk Utility. Select your SD card in the left pane. Click the Erase button, select ExFat, give it a name, and click the Erase button.
Install the downloaded image
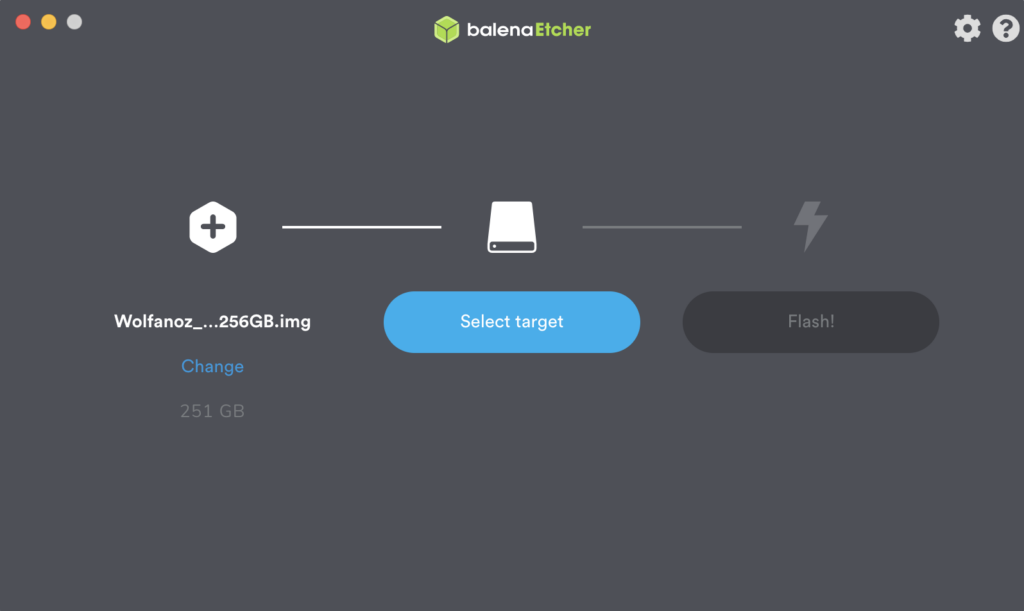
To install RetroPie, we’ll use a third-party utility called Etcher. Etcher works on both Windows and Mac.
Download and install Etcher, open it, and select your SD card drive and downloaded image to “flash” the image to your SD card.
Put the flashed SD Card into your Raspberry PI and Connect your peripherals
Safely eject the SD card and slide it into your Raspberry Pi.
Next, connect the Playstation 4 controller via USB, and connect the Micro-HDMI to HDMI cable to a monitor or TV. Finally, connect the MicroUSB power supply. Always connect the power supply after connecting your other peripherals so that your Pi will detect all of the peripherals properly on boot. The one we are using for this build also has an inline power switch.
Your Pi will now boot!
Connect your RetroPie to the Internet
Connecting the Pi to your network will allow you to access it remotely via SSH to perform additional configurations, tweaks and updates/fixes.
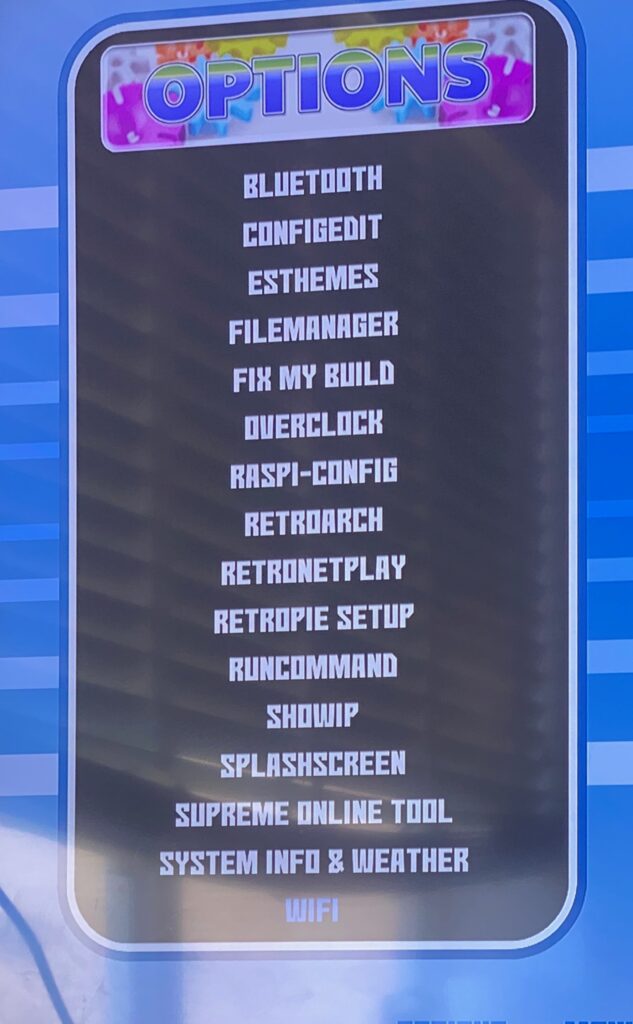
To connect, select the RetroPie menu icon and then select WIFI.
Follow the directions to choose your WIFI SSID and input your password.
You can then select show ip Menu to see your IP on your network.
You can connect via SSH by opening Terminal (Mac) or using an SSH tool like putty for (Windows) and then using the commands (Depending on build you may need to start SSH):
SSH user@RETROPIE(or iP for example SSH pi@64.233.177.99)
Password
You may need to accept Keys depending on image by typing yes.
Your credentials may vary and you can reset them as well. Usually default is pi:raspberry where pi is the username and the password= raspberry.
Please be careful and standard best practice is to change these credentials to something more secure.
https://www.raspberrypi.org/documentation/linux/usage/users.md
Configuring the Playstation 4 Controller
You’ll now want to configure the Playstation 4 controller to work with your Pi.
Make sure your keyboard is connected and working as well for navigation or you can use another wired USB controller.
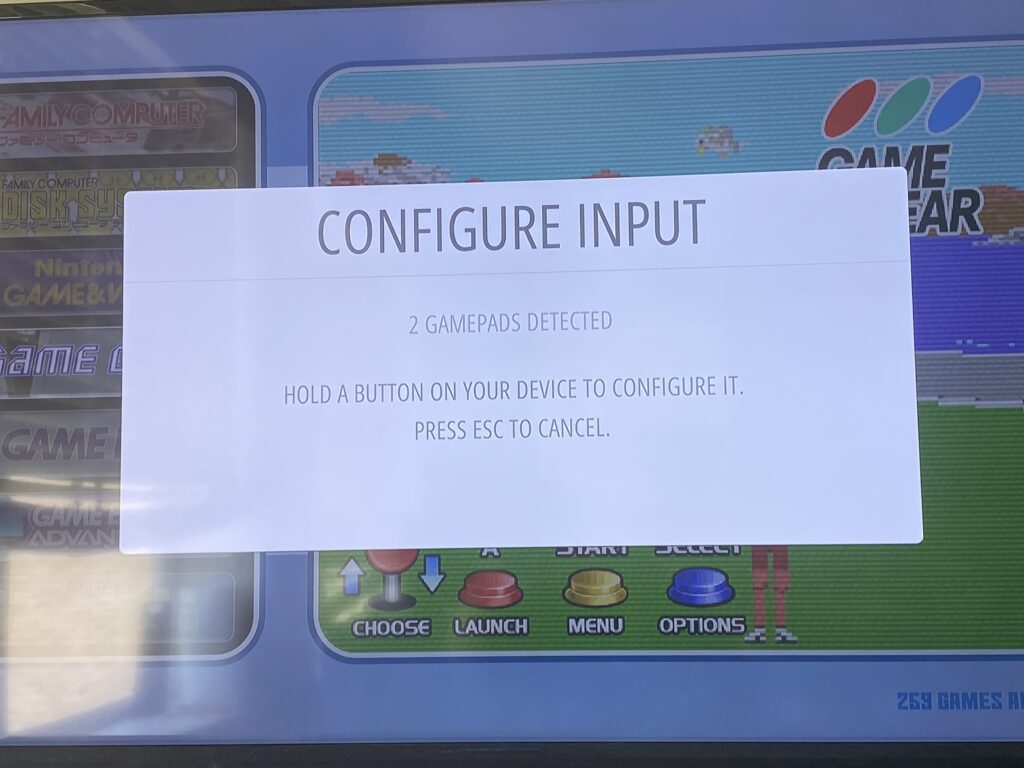
To configure your controller to work with the menu system and games, boot up your Pi. Your Pi will automatically launch the RetroPie UI where you will be prompted to configure the Playstation 4 controller connected via USB. If you run into any issues, you can access this configuration menu again later by pressing Start in the RetroPie UI.
After configuration you should enter the Bluetooth menu in RetroPie Options.
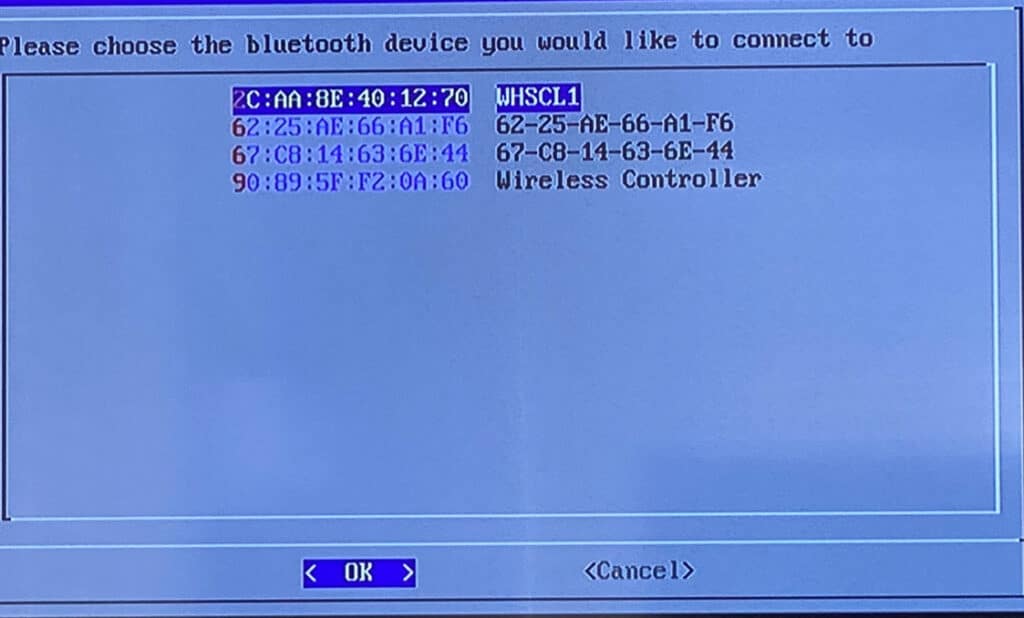
One you are in the Bluetooth menu from the Retropie menu, we will choose option R, Register and Connect to Bluetooth Device. It will prompt you to disconnect the Playstation 4 controller from the usb cable and to hold Share and PS button on the Playstation 4 controller. This will put the controller into Bluetooth pair mode. Follow the prompt message to reconnect the Playstation 4 controller via the usb cable. After a few seconds it should detect the wireless controller, pick the option and a new screen will pop up asking to choose the security mode. Select 1- DisplayYesNo. You should then get a successfully registered and connected screen and notice the controllers light is solid. But we aren’t done just yet.
Now the controller successfully pairs, we need to get back to the emulation station controller set up screen to configure the Playstation 4 controller via Bluetooth. There are a few ways to get to this screen (reboot, restart emulation station via terminal/ssh) Once you get back and configure the Playstation 4 controller you can use it with retropie wirelessly.
(We experienced some audio glitches when the Playstation 4 controller was plugged into the raspberry pi via usb cable, where the audio was being hijacked by the PS4 Controller. Don’t fret the audio will come back when you unplug/plug the PS4 Controller. If anyone knows a more permanent fix when you wish to play wired please let me know in comments and I will update.)
Playing Games
Now you can enjoy some of the many Retro Games that come with this great image from Wolfanoz – https://www.arcadepunks.com/256gb-fully-loaded-supreme-pro-raspberry-pi-4-image-from-wolfanoz/
Including N64 and Dreamcast!!
Exiting Games
To exit a game, press the START and SELECT buttons at the same time. This will bring you back to the RetroPie UI.